Notifications & Alerts Setup
Configure email and SMS notifications to stay informed when your AI receptionist receives calls and messages.Prerequisites
- Active Welco AI account
- Email notifications: Available on all paid plans
- SMS notifications: Available on Professional and Business plans only
Accessing Notification Settings
- Navigate to Notifications from your dashboard sidebar
- You’ll see the main notifications page with “Configure your notification preferences”
- Click Create Notification to add a new notification rule
Creating Notification Rules
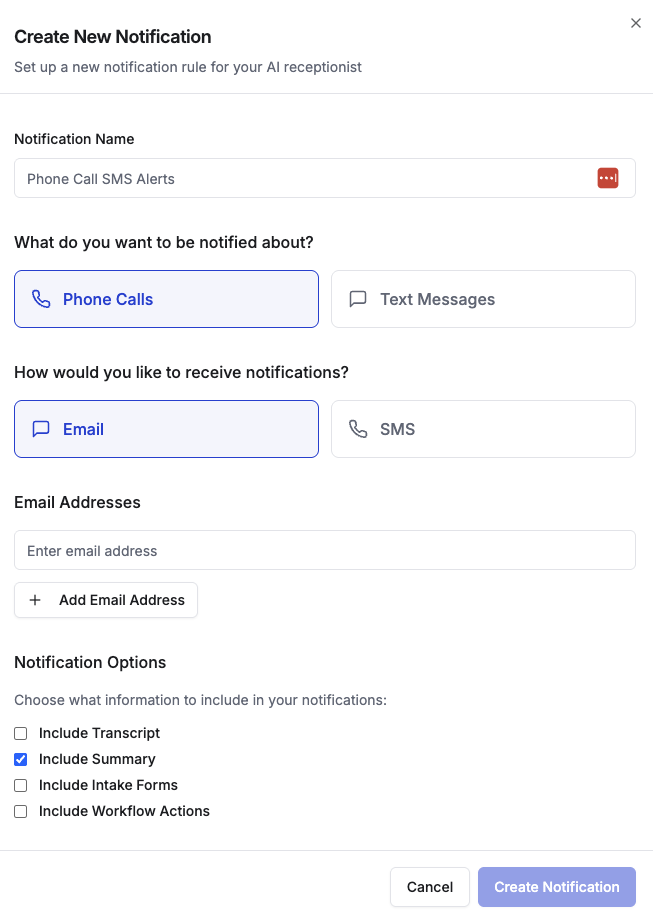
Step 1: Name Your Notification

- In the “Create New Notification” dialog, enter a descriptive name
- Example: “Phone Call SMS Alerts” or “Email Call Notifications”
Step 2: Choose What to Monitor
Select what events should trigger notifications:- Phone Calls - Get notified when your AI receptionist receives calls
- Text Messages - Get notified when SMS messages are received
Step 3: Select Notification Method
Choose how you want to receive alerts:- Email - Receive detailed email notifications (all plans)
- SMS - Receive text message alerts (Professional/Business plans only)
Step 4: Configure Recipients
For Email Notifications:
- Enter email addresses in the provided fields
- Click Add Email Address to include multiple recipients
- Remove unwanted addresses using the trash icon
For SMS Notifications:
- Enter phone numbers using the international format picker
- Select the correct country code from the dropdown
- Click Add Phone Number to include multiple recipients
- Remove unwanted numbers using the trash icon
Step 5: Customize Notification Content
Configure what information to include in your notifications:- Include Transcript - Add the full conversation transcript
- Include Summary - Add an AI-generated call summary
- Include Intake Forms - Add any completed intake form data
- Include Workflow Actions - Add details about automated workflow actions taken
Step 6: Save Your Configuration
- Review your notification settings
- Click Create Notification to save
- Your new notification rule will appear in the notifications list
Managing Existing Notifications
View Notification Details
- All active notification rules are displayed on the main Notifications page
- Each rule shows the notification name, trigger type, delivery method, and recipient count
- Creation date and current status (Enabled/Disabled) are also visible
Enable/Disable Notifications
- Find the notification rule you want to modify
- Use the toggle switch to enable or disable the notification
- Disabled notifications will not send alerts until re-enabled
Edit Notification Settings
- Click the Settings icon (gear) next to any notification rule
- Modify recipients, notification content options, or other settings
- Click Save Changes to update the configuration
Delete Notifications
- Click the Settings icon next to the notification you want to remove
- Select Delete from the options menu
- Confirm the deletion when prompted
Next Steps
After setting up notifications:- Test your configuration by making a test call to your AI receptionist
- Monitor notification delivery and adjust settings as needed
- Consider setting up multiple notification rules for different scenarios
- Review and update recipient lists regularly to ensure notifications reach the right people